
Dynamics 365 Retail MPOS
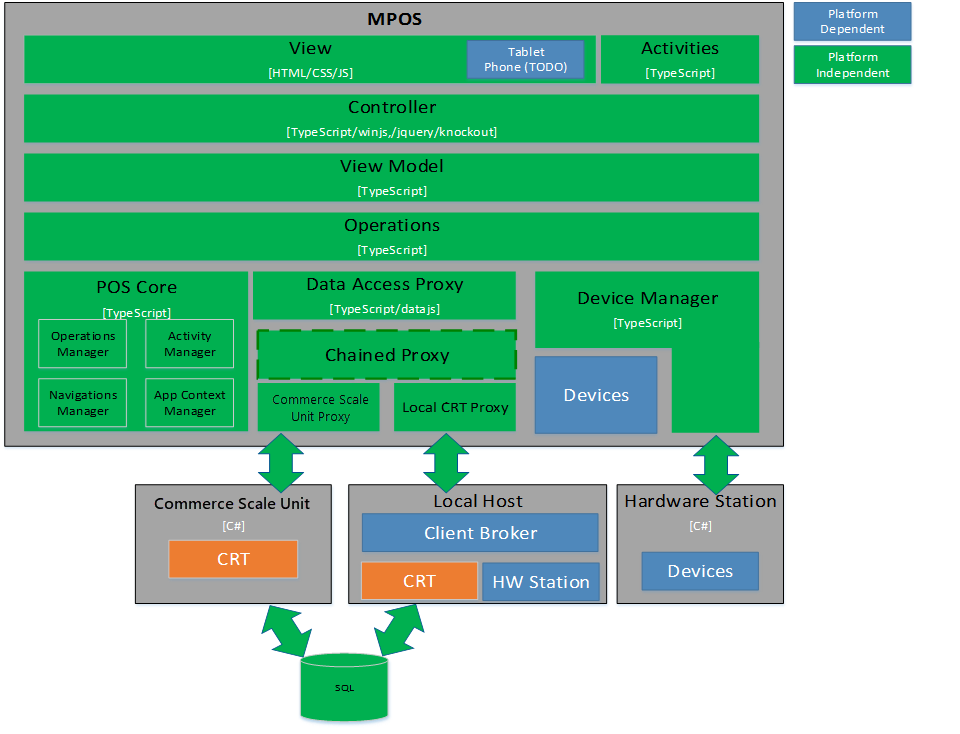
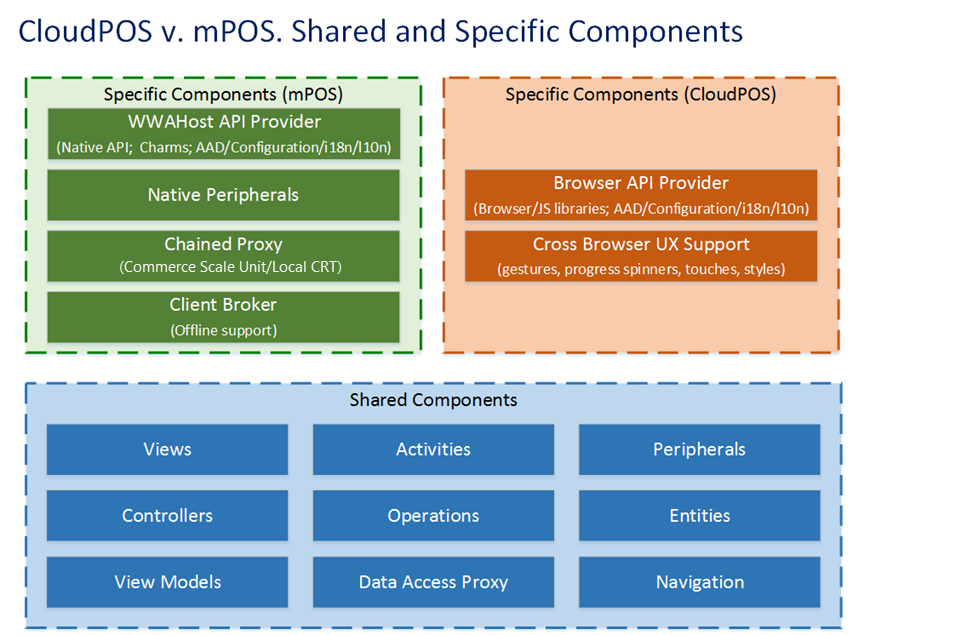
POS Archtecture
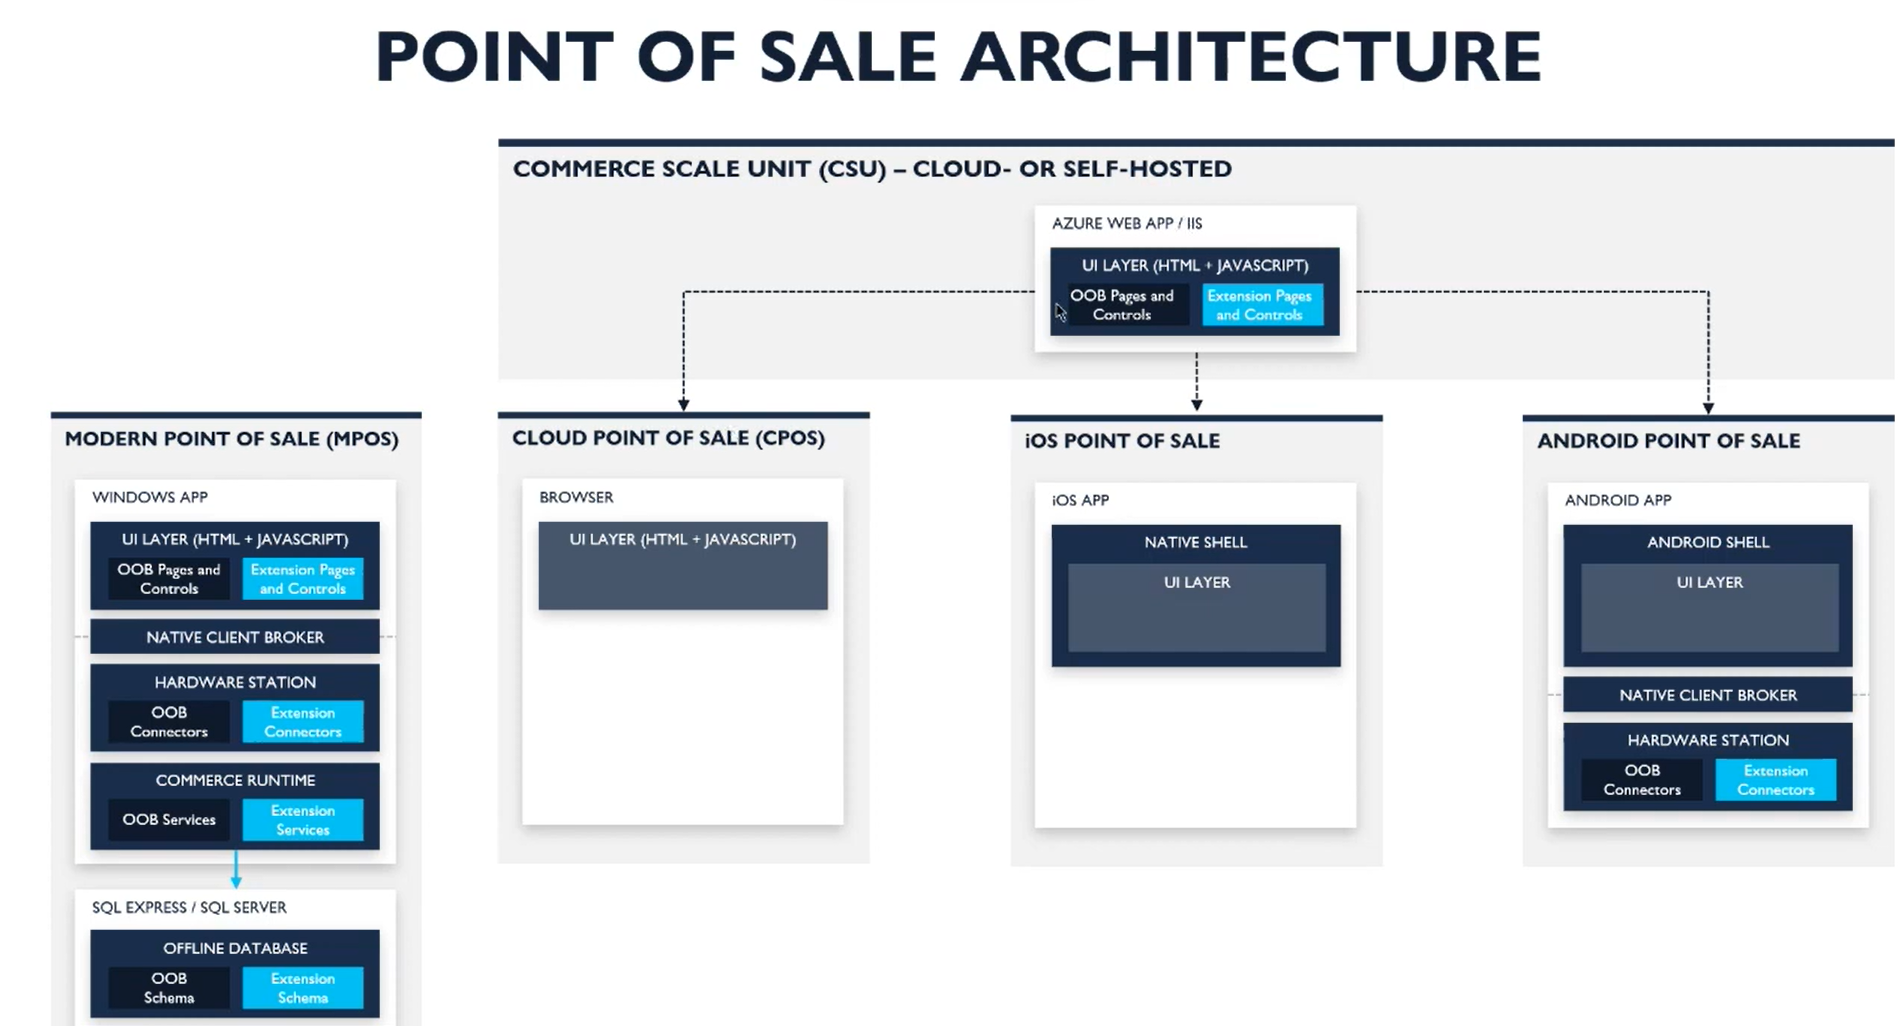
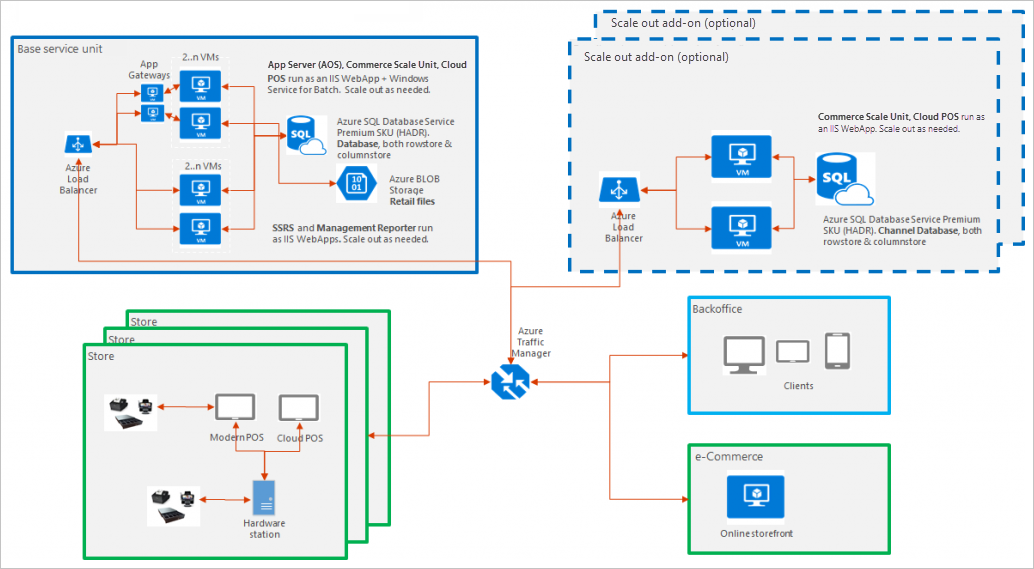
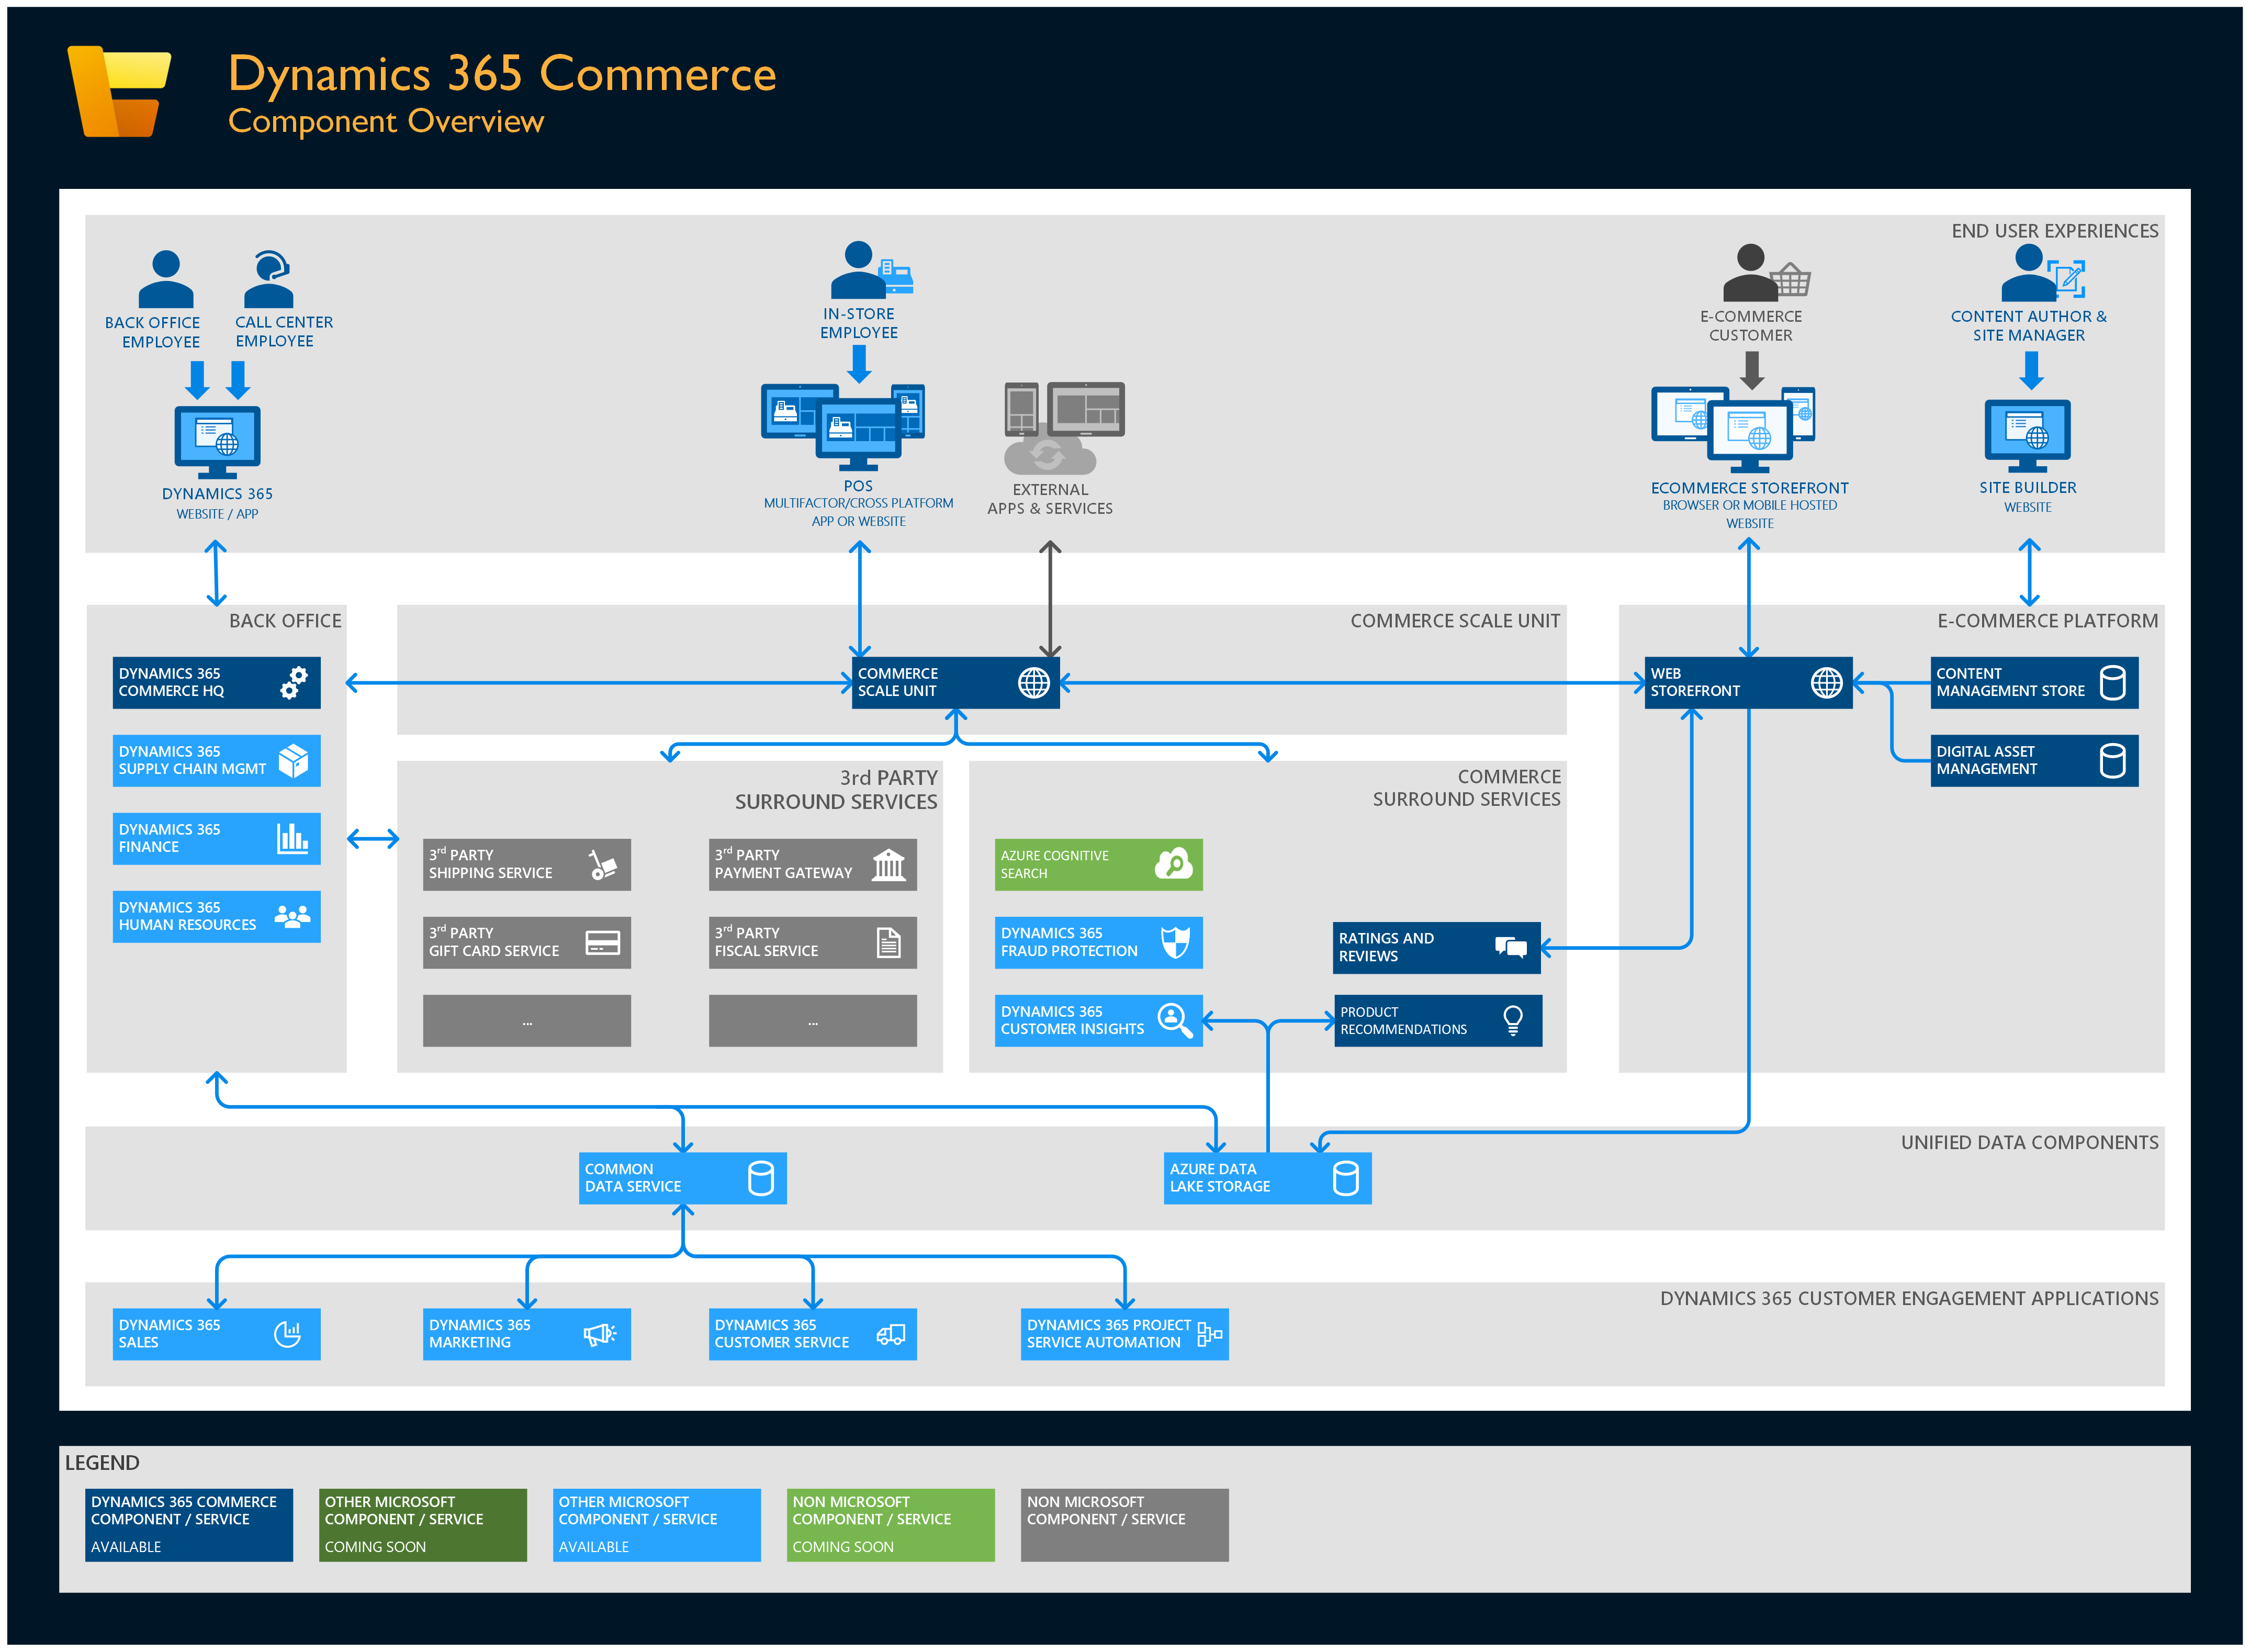
Retail topology architecture
https://learn.microsoft.com/en-us/dynamics365/commerce/dev-itpro/retail-sdk/sdk-github
Migrate without uninstall and re-activation of MPOS devices
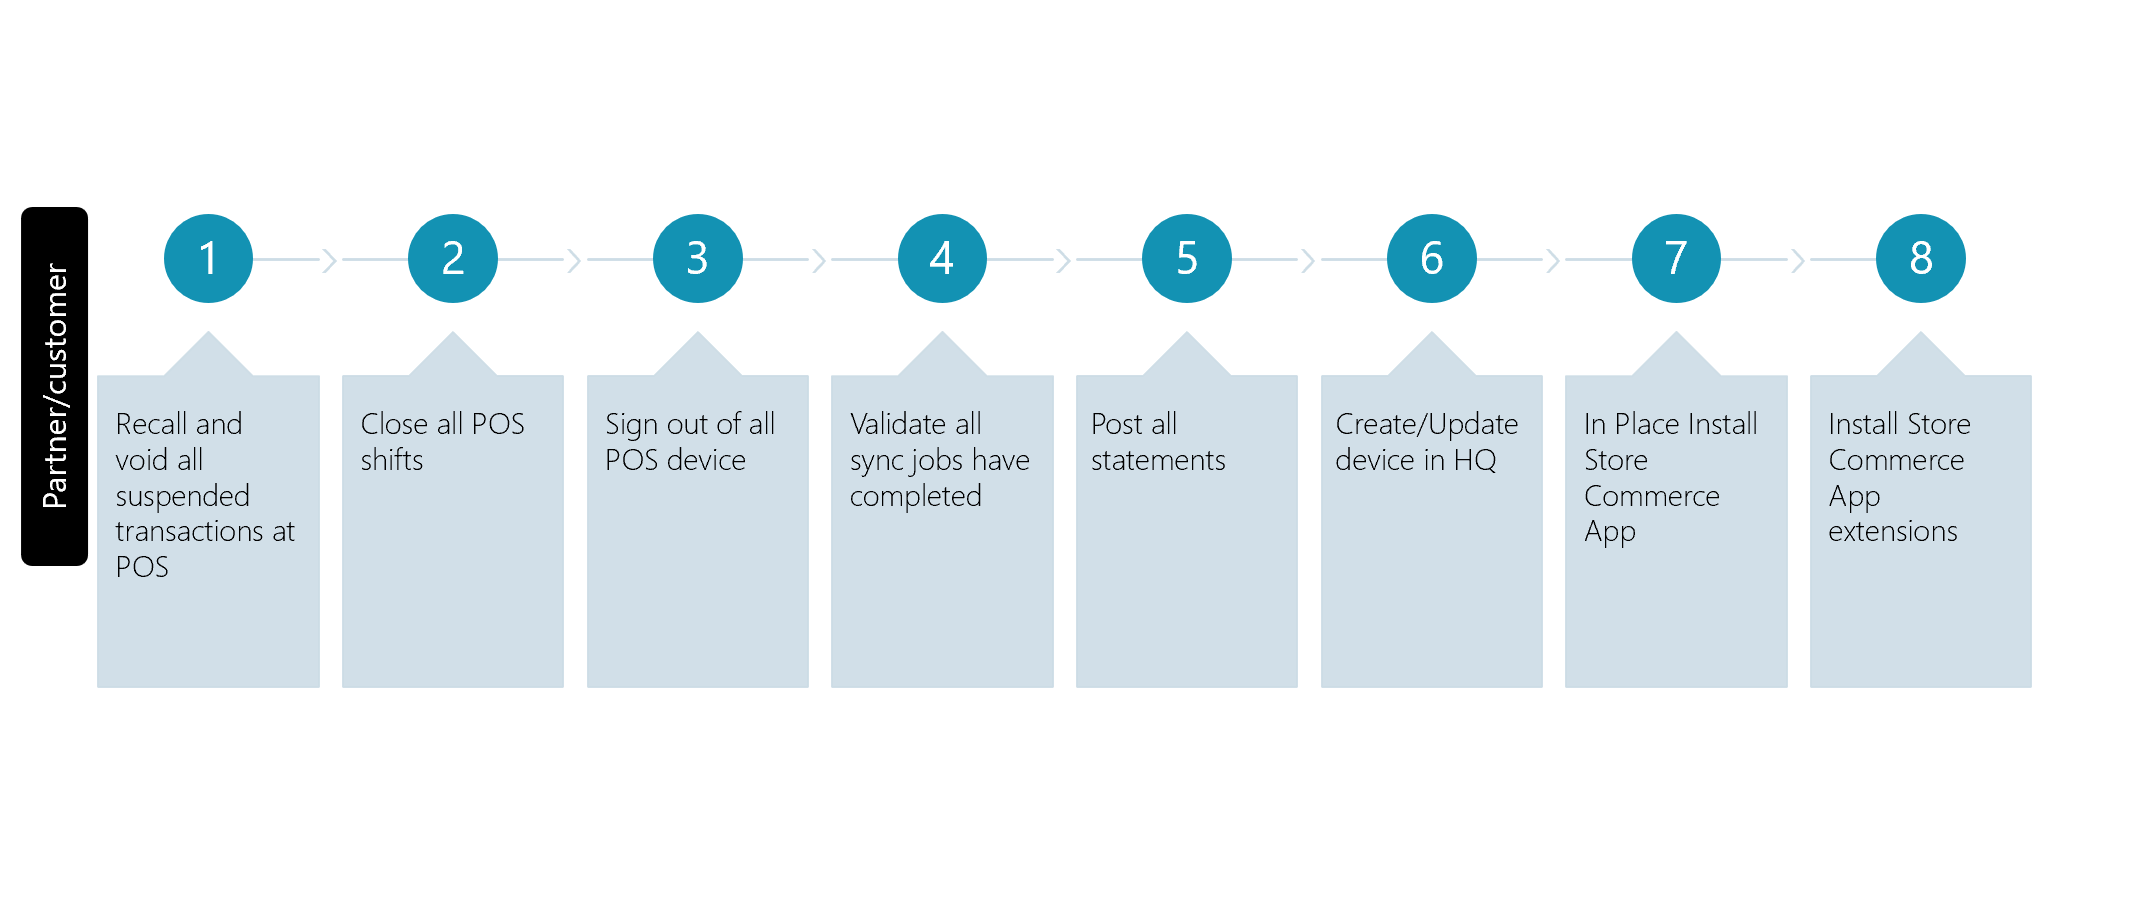
To create and set up a new device, follow these steps.
In Commerce headquarters, go to Retail and Commerce > Channel setup > POS setup > Devices.
Create a new device, and select either Modern POS - Android or Modern POS - iOS as the application type, depending on the mobile app that you're deploying.
Note
The Modern POS - Android and Modern POS - iOS application types are also used to deploy the current hybrid apps for Android and iOS. After the deprecation of MPOS, the labels for these application types will be updated to Store Commerce - Android and Modern POS - iOS.
Important
The Store Commerce apps for Windows, Android, and iOS are the next generation POS applications for Dynamics 365 Commerce. The Store Commerce apps offer numerous improvements over their predecessors while retaining full functional and feature parity. Microsoft will deprecate MPOS and the Retail hybrid apps for Android and iOS in October 2023, and recommends that you use the Store Commerce apps for Windows, Android, and iOS and Store Commerce for web for all new POS deployments. Existing customers should plan to migrate from MPOS and the Retail hybrid apps to Store Commerce. For more information, see Migrate Modern POS to Store Commerce.
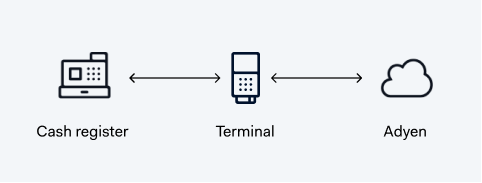
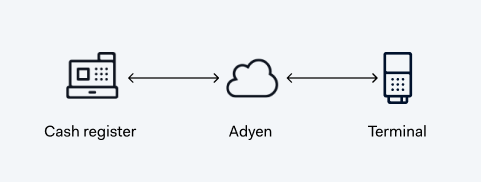
Choose an integration architecture
Local communications With a local Terminal API integration, your POS system communicates directly with the terminal over your local network. To make a payment, you make an API request directly to the IP address of the terminal, for the shopper to complete the transaction. You receive the result of the payment synchronously.
Cloud communications
This article explains how to add a new custom field to the Totals panel on the POS transaction screen by using the screen layout designer. This article is applicable to Microsoft Dynamics 365 Finance 7.3 and later, and to Microsoft Dynamics 365 Retail 7.3 and later.
Custom fields that you add for the Totals panel on the Custom fields page will appear in the designer. You can then select which custom fields should be in the left and right columns. The logic for the custom fields should be coded in the point of sale (POS) extensions.
Scenario/business problem You will add a custom field to the Totals panel on the POS transaction screen by using the screen layout designer. You will also code the business logic for the custom field in the POS extensions.
Overview of the required steps First, you must complete these steps to configure Headquarters.
On the Language text page, add the language text for the custom field. On the Custom fields page, add the new custom field. In the screen layout designer, add the new custom field to the Totals panel. Run the Registers (1090) job. You must then complete this step in the POS extension project.
Add the business logic for the custom field.
Configure Headquarters Sign in to Commerce.
Go to Retail and Commerce > Channel setup > POS setup > POS profiles > Language text.
On the POS tab, select Add to add a new POS language text.
The text that appears in the Totals panel can be localized. Therefore, you can create multiple texts in different languages for the same text ID. Here is an example.
Language ID Text ID Text en-US 1 Sample en-UK 1 Demo On the Action Pane, select Save to save your changes.
Go to Retail and Commerce > Channel setup > POS setup > POS profiles > Custom fields.
On the Action Pane, select New to add a new custom field, and specify the following information:
In the Name field, enter the name of the custom field. In the Type field, select Totals area. In the Caption text ID field, specify the text ID that you used in step 3. Here is an example.
Name Type Caption text ID Sample Totals area 1 On the Action Pane, select Save to save your changes.
Go to Retail and Commerce > Channel setup > POS setup > POS > Screen layouts.
Select the F3MGR screen layout ID, and then, on the Action Pane, select Designer.
Note
You can select any existing layout or create a new layout. The F3MGR screen layout ID is available only if you're using demo data.
Select the 1440x960 – Full layout size, and then select Layout designer.
If you're prompted to confirm that you want to open the application, select Open, and then follow the installation instructions.
After the designer is installed, you're asked for Azure Active Directory (Azure AD) credentials. Enter the information to start the designer.
In the designer, drag the Totals panel control from the left pane to the screen layout. If the layout already includes a Totals panel, the control appears dimmed in the left pane.
In the screen layout, right-click the Totals panel, and then select Customize.
In the Customization - Totals panel dialog box, the SAMPLE custom field should appear in the Available fields list. Move it to either the left column or the right column by using the arrow buttons.
To move the custom field up or down, use the Up and Down buttons.
Select OK to save your changes and close the Customization - Totals panel dialog box.
Select the Close button (X) in the upper-right corner to close the designer.
When you're prompted to save your changes, select Yes. If you select No, your changes aren't saved.
Go to Retail and Commerce > Retail and Commerce IT > Distribution schedule.
Select the Registers (1090) job, and then select Run now.
Add business logic to the custom field You can find similar sample code in the Retail software development kit (SDK), at …\RetailSDK\POS\Extensions\SampleExtensions\ViewExtensions\Cart\TipsCustomField.ts.
Start Microsoft Visual Studio 2015 in administrator mode.
Open the ModernPOS solution from …\RetailSDK\POS.
Under the POS.Extensions project, create a folder that is named CustomFieldExtensions.
Under the CustomFieldExtensions folder, create a folder that is named Cart.
In the Cart folder, create a .ts (typescript) file that is named SampleCustomField.ts.
In the SampleCustomField.ts file, add the following import statement to import the relevant entities and context.
TypeScript
Copy import from "PosApi/Extend/Views/CartView"; import from "PosApi/Entities"; Create a class that is named SampleCustomField, and extend it from the CartViewTotalsPanelCustomFieldBase class. In this way, the computeValue method from the base class will do any custom logic for the custom field.
TypeScript
Copy export default class SampleCustomField extends CartViewTotalsPanelCustomFieldBase {
} Inside the SampleCustomField class, implement the abstract computeValue method to set the logic for the custom field.
TypeScript
Copy public computeValue(cart: ProxyEntities.Cart): string {
// Let's show 10% of total amount in the custom field.

if (isNaN(cart.TotalAmount) || cart.TotalAmount <= 0) {
    return "$0.00";
}
return "$" + (cart.TotalAmount * 0.1).toFixed(2).toString();
} The overall class should look like this.
TypeScript
Copy import from "PosApi/Extend/Views/CartView"; import from "PosApi/Entities";
export default class SampleCustomField extends CartViewTotalsPanelCustomFieldBase { public computeValue(cart: ProxyEntities.Cart): string {
    // Let's show 10% of total amount in the custom field.
    if (isNaN(cart.TotalAmount) || cart.TotalAmount <= 0) {
        return "$0.00";
    }
    return "$" + (cart.TotalAmount * 0.1).toFixed(2).toString();
}
} In the CustomFieldExtensions folder, create a .json file that is named manifest.json.
In the manifest.json file, paste the below code.
TypeScript
Copy { "$schema": "../manifestSchema.json", "name": "Pos_Extensibility_Samples", "publisher": "Contoso", "version": "7.3.0", "minimumPosVersion": "7.3.0.0", "components": { "extend": { "views": { "CartView": { "totalsPanel": { "customFields": [ { "fieldName": "Sample", "modulePath": "Cart/SampleCustomField" } ] } } } } } } In the manifest, note that the fieldName value in the customFields section should match the name of the custom field added in the Headquarters, the name you specified for the custom field in step 6 of the "Configure Headquarters" procedure. modulePath is the name of the implementation file, the implementation file name is the name of the file that you created in step 5 of "Add business logic to the custom field" procedure.
If you add multiple custom fields, you should add multiple implementation files and update the information under the custonFileds section.
For example, if you add two custom fields, Sample1 and Sample2, you should have two implementation files that extend from the same base class, CartViewTotalsPanelCustomFieldBase.
In this case, the manifest should look like this.
TypeScript
Copy "customFields": [ { "fieldName": "Sample1", "modulePath": "Cart/SampleCustomField1" }, { "fieldName": "Sample2", "modulePath": "Cart/SampleCustomField2" } ] In this example, SampleCustomField1 and SampleCustomField2 are the names of the typescript files where you will do the business logic.
Open the extensions.json file under the POS.Extensions project, and update it with the CustomFieldExtensions samples, so that POS will load this extension at runtime.
TypeScript
Copy { "extensionPackages": [ { "baseUrl": "SampleExtensions2" }, { "baseUrl": "CustomFieldExtensions" } ] } Open the tsconfig.json file, and add the extension folder name CustomFieldExtensions and comment out the extension folder in the exclude list. POS will use this file to include or exclude the extension. By default, the exclude list contains all the excluded extensions. To include an extension as part of the POS, you must add the extension folder name and comment out the extension in the extension list, as shown here.
TypeScript
Copy "exclude": [ "SampleExtensions", //"SampleExtensions2", //"CustomFieldExtensions" ], Compile and rebuild the project.
Deploy the customized version of Retail Modern POS (MPOS) by selecting the Local Machine button. Make sure that the solution platform is x86. Alternatively, you can create a deployable package and install MPOS from it.
Note
Although MPOS is used in this article, you can use either MPOS or Cloud POS.
Validate the customization Sign in to MPOS by using 000160 as the operator ID and 123 as the password. On the welcome screen, select the Current transaction button. Add any item to the transaction. The custom field should appear in the Totals panel.